Digitization Policies and Procedures
- File Digitization Procedure Overview
- Prepare documents for scanning
- Scan documents
- Check scanned files for good quality
- Name scanned files
- Complete folder content sheet
- Fill out the metadata spreadsheet
- Clean scanned document in Photoshop
- Convert scanned files to appropriate archival standard file types
- Give files to Chelsea for web upload
- Repeat process for each file See below for details on how to complete each step.
*Students, please follow supervisor instructions on which steps you will be completing.
File Digitization Procedure Details
- Take an “out guide” and a pen to the shelves and find a file which has either no status markings or only a black mark. Partially pull out the file to complete information needed on the “out guide”. Slide the “out guide” in beside the file, then pull out the file.
- In the
\\mbmgs1a\mining archives$\Working Folder\Current Workcheck if the folder has already been scanned. If it has been scanned, its name should contain the name of the student assigned to it. - Before scanning, the folder contents should be organized and sorted. First sort the contents by type and in this order:
- Reports
- Assays
- Surveys
- Notes
- Forms
- Maps
- Correspondence
- Notes
- News Clippings
- Photos
- Publications
- Miscellaneous
- Other
- Before scanning a folder, go through each of the contents to prepare the documents for scanning and to know what to watch for while scanning. See guidelines below:
- Scan all pages of each document or group of documents. Press "Finish Scan" on the
Kyocera
scanner to save each group as individual pdf/a scans. The pdf/a scans will be sent to the
"Scans" folder.
Kyocera Scanning Instructions
- After scanning: Open the new scan in the "Scans" folder to ensure that all pages were captured correctly. If there are any errors, please rescan the pages. When a scan is complete, create a folder with a simple name indicating the name of the physical folder in "Working Folder>Current Work".
- If you are scanning a folder labeled "Iron Mask" and it is from Broadwater County, for
example, please label the folder as
Broadwater_Iron_Mask. - If you are scanning documents from a special collection, please ask a full-time staff member for directions for the names of the scans and folder.
- Copy the pdf/a scan into the newly created folder. Delete the scan from the "Scans" folder after ensuring the copy was successful.
- Complete a folder content form for each folder. A physical copy should be placed at the front of each physical folder. A digital copy may be kept with the digital file folders.
- Complete the metadata spreadsheet giving a row to each file. Detailed instructions are included in the attached spreadsheet and are listed below.
- Optimizing Scans: The goal is to ensure the documents are straight and legible.
Reference the physical folder as needed when you are optimizing the digital files. When you are not working on that folder, please keep it in the file sorter at your workstations.
Click here for more detailed tutorials about Photoshop tools.
Clean, straighten, resize pages according to procedures and any other guidance you receive. If you have questions, please ask.- Straightening: Documents should be straightened as much as possible. For documents that contain several other document images on them (Mine Status Card, for example), each " sub-image" should be straightened so that all of them are straightened on the page.
- Rebuilding Text: Ask a full-time staff member for assistance in determining if
missing text needs to be rebuilt. As needed, use the clone tool or copy via layer as
much as feasible to repair missing or illegible text. Try to use a brush size and
fuzziness setting that matches the original text as much as possible. If the document is
a publication from other agencies, like the USGS, it might be more efficient to download
the digitized version from their website.
If the sides of documents were "cut off" in the original that we have in our file, recreate as directed by a full-time staff member. - Backgrounds: Backgrounds seldom need to be replaced, but if you think it would be
useful to do so, please consult with a full-time staff member.
You can use an existing background from the Backgrounds folder in the Working folder, or you can create a background layer using the clone tool or other appropriate technique.
Most backgrounds have a texture in them, so using one solid color as a background (unless the original background was pure white) is not an optimal solution. - Consistency: If you use image settings on the first page of a multiple page document (e.g. Image, Adjustments, Levels or Exposure, Brightness, Contrast, etc.), write those settings down and apply them to each successive page to maintain a consistent look throughout the entire document.
- Layers: Remember to flatten your layers before saving your work
- Page Size: If the original document is smaller than the standard letter size,
crop the image to its original size. When you have completed optimizing the image, go to
Canvas Size and change the size to 8.5 x 11. Whenever possible, please use the portrait
orientation. (8.5 x 11 instead of 11 x 8.5). The anchor setting should be set to the
center square (see below).
Adjusting the page size should be one of the last tasks you perform. Make sure that you check the canvas page size and adjust as necessary. If the pages you are working on are an unusual size, see a full-time staff member for direction.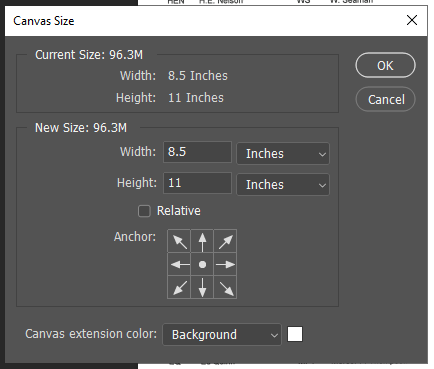
- Finally, save the document in the JPF format. All the default settings for saving as a JPF will work, EXCEPT that the 'Lossless' box should be checked.
For additional help with cleaning the documents in Photoshop, please access the link below:
Cleaning Documents in Photoshop
- In the "Originals" folder, each document should be in either PDF or TIFF format depending on how the file was scanned. Scans using the Rowe scanner will be in TIFFs and scans using the Kyocera will be in PDFs. Use Photoshoshop to convert JPGs to PDF/As and PDF/As to JPGs. TIFFs will remain as TIFFs in the Originals folder.
- Copy the JPGs from the Originals folder and paste them into the Jpgs folder. The JPGs should not be edited in the Originals folder. Once edits for the JPGs are finished, convert all JPGs to JPFs.
- Quality Assurance Review: Place a post-it note with your name on the physical file to
identify whose work we are reviewing, and give physical file to the appropriate person. Full
time staff will review the digital file and reference the physical file as needed.
If the file is returned to you with notes for improvements, when you return the file, please keep all notes with the file.Full-time staff will update the markings on the folder to reflect completed stages of work on that folder. Staff will also convert and put PDF/A files into the PDFs folder.
- Each day, record your hours and work in your Timekeeping and Work Log.
The lines on the end of each folder represent the level of completed work
for each folder’s contents.
Black=catalogued
Blue=scanned
Red=cleaned
Green=quality assurance completed
Purple=uploaded and available on MBMG website
Full time staff will organize and rename the folders, adding the name of the student to whom it has been assigned.
| Paper-clipped together | Remove all paperclips; after scanning, re-clip the document set with an archival, stainless-steel paperclip. |
| Stapled together | Remove all staples using the metal micro-spatula (located in the supply drawer behind the work counter). With the spatula, carefully bend the ends of the staple up to a vertical position, then slide the spatula under the staple and gently pull it out of the document. After scanning, paper clip the document set together with an archival stainless-steel paper clip. |
| Glued | Gently try to pull glued pages apart; please see a Staff Member for assistance or direction if the pages do not easily separate. |
| Bound | Remove the document binding if possible; please see a Staff Member for assistance or direction if the pages do not easily separate. |
| Printed on both sides of the paper | If the document can go through the document feeder, and it is two sided, you will need to change the settings to scan both sides. If it cannot go through the document feeder, you do not need to change the settings. Please be sure to scan both sides manually. |
| Folded in half, third, or with other documents inside | Open and separate each folded document to select proper scanner page size setting. Change the page size setting from the default (letter) to the appropriate page size; An incorrect setting will result in data loss on your scan.You can also scan all pages at the ledger setting, but you will need to correctly crop pages as needed to reflect the correct size. For odd-sized scans, use a larger setting to ensure that the scan contains all document data. |
| Multiple sized pages in a document | Open and separate each folded document to select proper scanner page size setting. Change the page size setting from the default (letter) to the appropriate page size; An incorrect setting will result in data loss on your scan.You can also scan all pages at the ledger setting, but you will need to correctly crop pages as needed to reflect the correct size. For odd-sized scans, use a larger setting to ensure that the scan contains all document data. |
| Onion skin paper | The tissue-like paper will tear in the document feeder. They need to be placed flat on the scanning glass. |
| Faint Printing | Adjust density setting adjustment and retain the same setting for multiple page documents. |
| Print visible from opposite side | Use Prevent Bleed Through for each page of affected documents. |
Student File Naming
Metadata Entry Procedures
Map Metadata Entry Procedures
Note: Each folder will contain three sub-folders, and each folders' contents will be different file formats.
Originals: PDF and TIFFs
JPGs: JPF (JPG2000)
PDFs: PDF/A
Each student has an Excel spreadsheet to record their work. Accurately
signing in and out on the left side of the sheet calculates your daily worked hours and
assists in completing Montana Tech time cards.
In the Work Log portion, please record
the work you completed. If you are working on the county property files, please record both
the county and the property names. If you are working on a grant funded project, please
record that and note the amount of hours in the far right column.
Please use the quarter
system when filling in hours on your timecards. For more information on this, please refer
to the Student Handbook.
What to Do With Blank Pages
- There are frequently blank pages in various places in documents. Depending on the context of the
page, you will want to take different actions.
- If the page is the back side of another page and is unnumbered then it will usually be deleted from both the Jpgs and Originals files (and will require renumbering the Originals). These serve no real purpose and have no information on them. Extra pages inserted after the title page also may be eliminated.
- Some reports have sections divided by pages with tabs, different colored paper or even plain white paper. If the inserted page is separating a chapter or report section and the “division” in the report is not readily recognizable, then retain the page. If the section and/or chapters are easily distinguished from the preceding chapter or section, the extra inserted page(s) may be deleted.